docs / setup
Installation Guide
The complete walkthrough for deploying DataCycle on a fresh Windows machine — exactly as shipped to the customer.
Overview
The complete walkthrough for deploying DataCycle on a fresh Windows machine. Every step the installer takes is documented below with the exact terminal output you should see, so you know whether it's working.
Time budget: about 4 hours on a first install (the silver backfill is the long pole — years of historical sensor data land in one go) or ~15 minutes on a re-install (watermarks let every step short-circuit on already-done work).
│ Treat the long first install like a build pipeline run, not a wizard.
│ Start it, walk away, come back to a finished system. There are no manual
│ steps in the middle — the installer handles all 10 phases automatically
│ and only stops at the very end for optional yes/no prompts — and even those can be pre-answered in the wizard for a fully unattended run.
What gets deployed
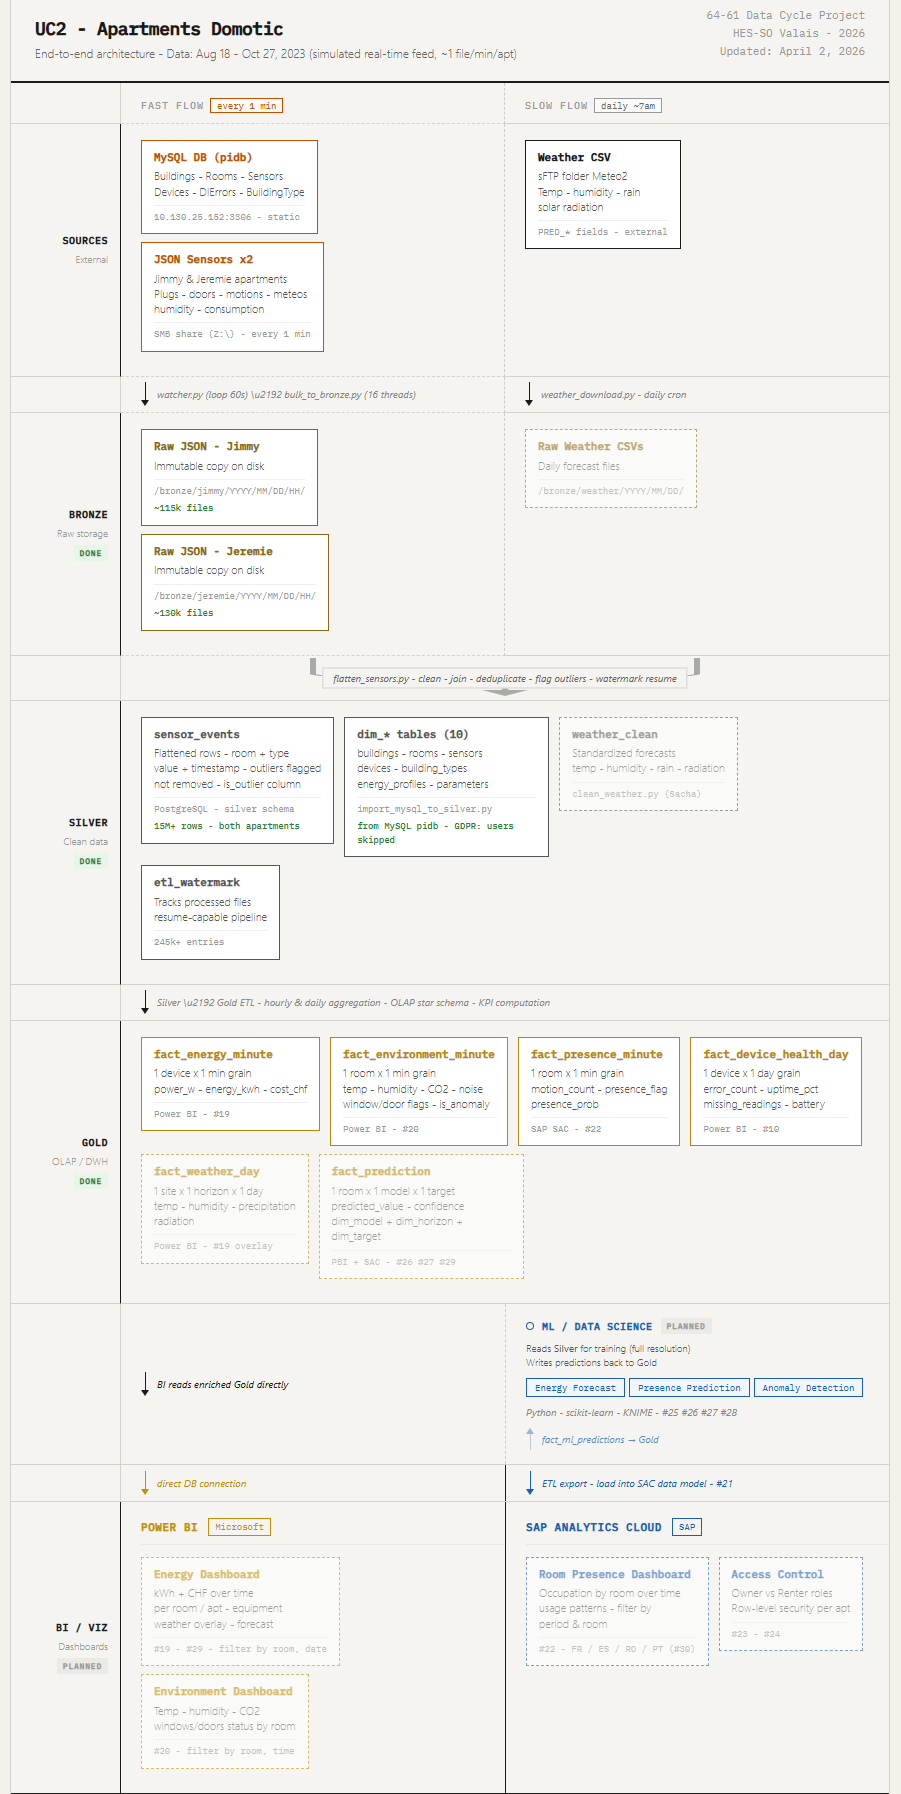
For context, here is the end-to-end pipeline the installer is about to set up:
Figure : End-to-end DataCycle pipeline (top half).
Figure : End-to-end DataCycle pipeline (bottom half).
Hardware & software requirements
Machine
Software you need installed first
Important — KNIME version: the workflows are pinned to KNIME 5.8.Installing a newer version (5.9+) on the target machine causes unsupported workflow version errors. Pick 5.8 from the KNIME archive page if you need to roll back.
Postgres tuning (one-time, before running the installer)
The default Postgres setting is shared_buffers = 128MB, which is too small for the unique-index check on silver.sensor_events once the table grows past a few million rows. Raising it to 4 GB keeps the index hot in RAM and brings the full backfill ETA from ~4 hours down to ~6 minutes. Apply this change once, before running the installer.
shared_buffers = 4GB
net stop postgresql-x64-17
net start postgresql-x64-17
Or open services.msc, find postgresql-x64-17, right-click → Restart.
SHOW shared_buffers;
It should return 4GB.
Rule of thumb: shared_buffers should be roughly 25 % of available RAM. The project VM has 16 GB, so 4 GB is right on that line. One-time only — the setting persists in postgresql.conf across re-installs.
Credentials you'll need
Have these ready before opening the install wizard:
— used only at install to create the app DB + user. Never written to disk after install.
This is the user the pipeline runs as.
The installer auto-detects Python, Git, Power BI, and KNIME on Windows.
Step 1 — Generate `data-cycle-installer.py` from the wizard
Open the project's install wizard at /install in your browser.
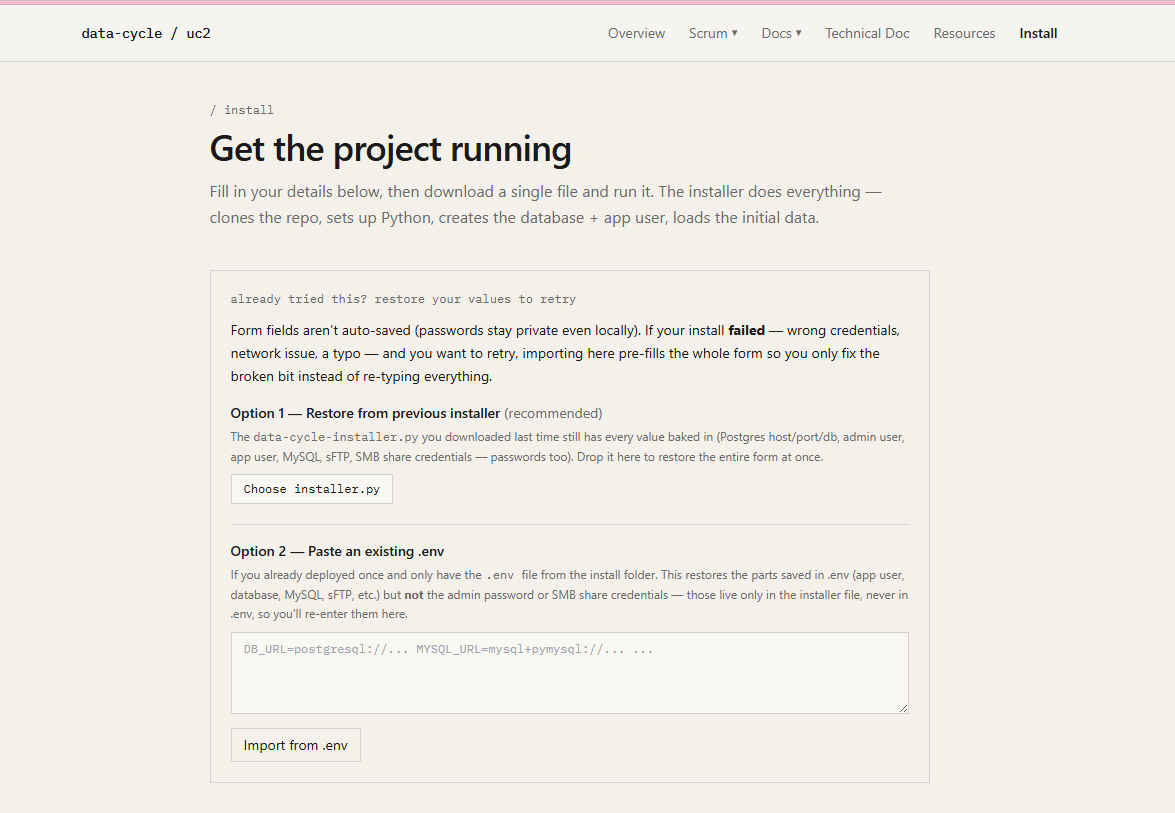
Figure : The install wizard landing page at /install.
The page summarises what you're about to deploy and lists prerequisites in plain English:
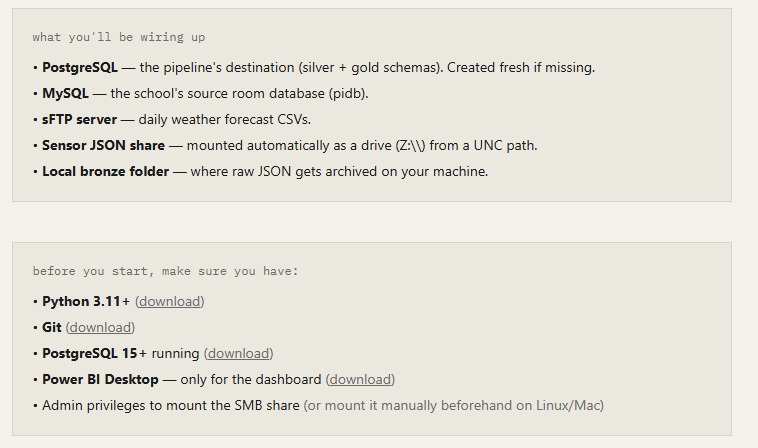
Figure : Prerequisites and what the installer will deploy.
Scroll down and fill in the form. Most fields have sensible defaults; the sections that need your input are credentials (Postgres / MySQL / sFTP) and the SMB share configuration:
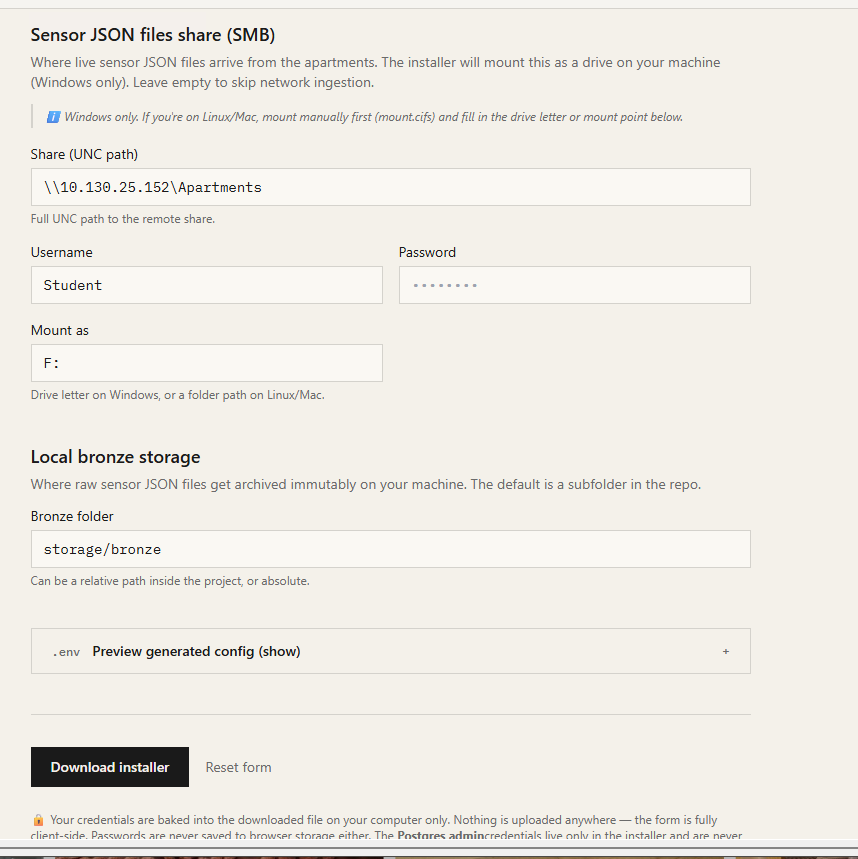
Figure : Credentials and SMB form fields in the wizard.
Optional — pre-answer the post-install prompts
Below the credentials form, the wizard has a Post-install actions section with six dropdowns (one per prompt the installer normally asks at the end). Each is a 3-state select:
The six actions you can pre-answer:
Leave them all on Ask during install for the standard interactive flow; flip the ones you've decided about for an unattended deploy.
Unattended install
For an unattended deploy, set every dropdown in the wizard's Post-install actions section to “Yes” or “No” before downloading the installer. The generated data-cycle-installer.py will run end-to-end without pausing, and the watcher (if you set “Start watcher now” to Yes) ends up in its own console window — so even running the installer from a CI script terminates cleanly with no orphan process.
Click Download installer. Every value you typed is now baked into the generated file. If you mis-typed something, the wizard has a Restore from previous installer uploader — drop the .py file in to pre-fill the form.
Tip: the downloaded file contains your passwords in plaintext. Keep it on the install machine only; don't commit it to a shared repo.
Step 2 — Run the installer
From a PowerShell or CMD window:
By default the installer creates ./data-cycle-domotic next to where you ran it. Pass a path to override:
What happens next is a 10-phase pipeline. Each phase prints its progress to the console; the installer never asks for input during phases 1–10 (only optional yes/no prompts at the very end).
Phase 1 — Prerequisite checks (~5 s)
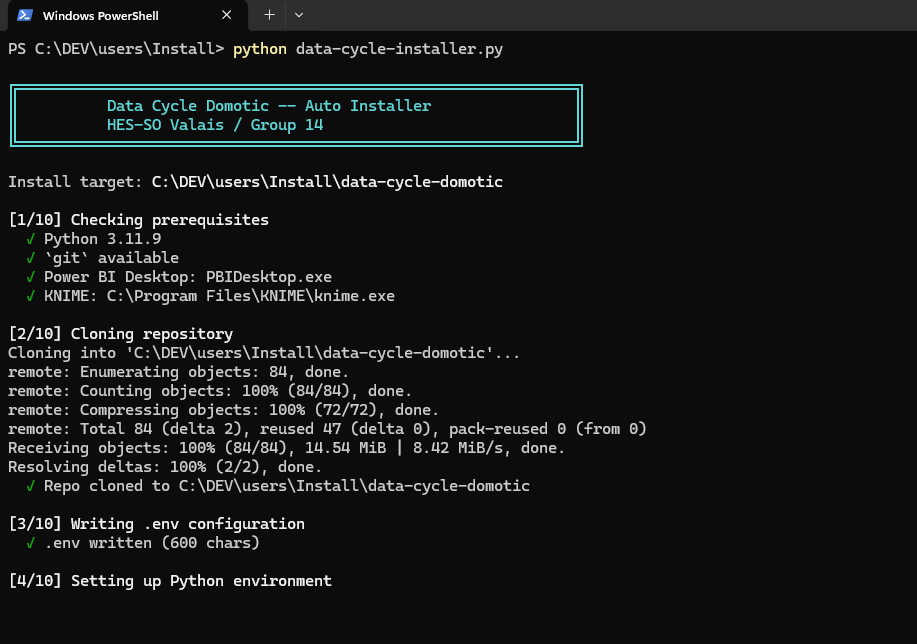
The installer probes for Python ≥ 3.10, git, PostgreSQL psql, Power BI Desktop, and KNIME Analytics Platform. Missing tools produce a clear warning and a download link, but the installer continues — Power BI and KNIME are only needed for their respective steps and can be installed after the fact (just re-run the installer once they're in place).
Figure : Phase 1 console output: prerequisite checks.
Phase 2 — Clone repo (~30–60 s)
Figure : Phase 2 console output: cloning the repo.
If the directory already exists, the installer does git fetch + git checkout -B main FETCH_HEAD instead of cloning fresh — re-runs always get the latest code.
Phase 3 — Write `.env` (<1 s)
All connection strings + credentials + tunables you typed in the wizard land in the project's .env file. The Postgres admin password is deliberately not written here; only the app user's credentials are.
Figure : Phase 3 console output: writing .env.
Phase 4 — Python venv + dependencies (~2–3 min)
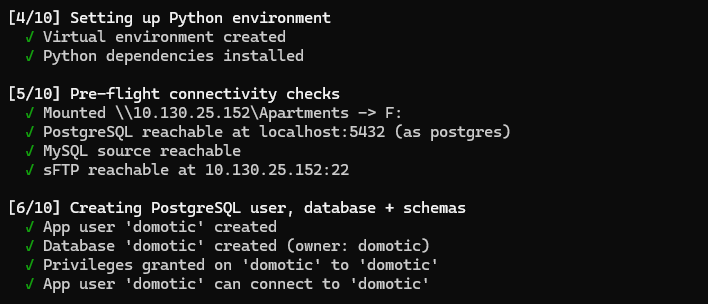
Figure : Phase 4 console output: venv and pip install.
The installer creates .venv\ and runs pip install -r requirements.txt. On a re-install pip skips already-installed packages and only catches new ones (e.g. matplotlib if you added it later).
Phase 5 — Pre-flight connectivity checks (~5–10 s)
The installer mounts the SMB drive (net use Z: \\server\share /USER:...), opens a quick Postgres connection, and verifies MySQL + sFTP credentials. If any of these fail it bails early with a clear error — better to fail in 5 seconds than 4 hours in.
Figure : Phase 5 console output: pre-flight connectivity checks.
Phase 6 — Database + schemas (~10–30 s)
Idempotent — uses CREATE IF NOT EXISTS everywhere. Re-running this phase on an existing install is a no-op.
Figure : Phase 6 console output: database and schema creation.
Phase 7 — Bootstrap silver (the long step)
This is what makes the first install long. There are four sub-phases:
(a) MySQL → silver (~25 s): The 10 master tables (buildings, rooms, sensors, devices, profile, dierrors, etc.) are imported into silver as dim/ref tables.
(b) SMB → bronze → silver backfill prompt:
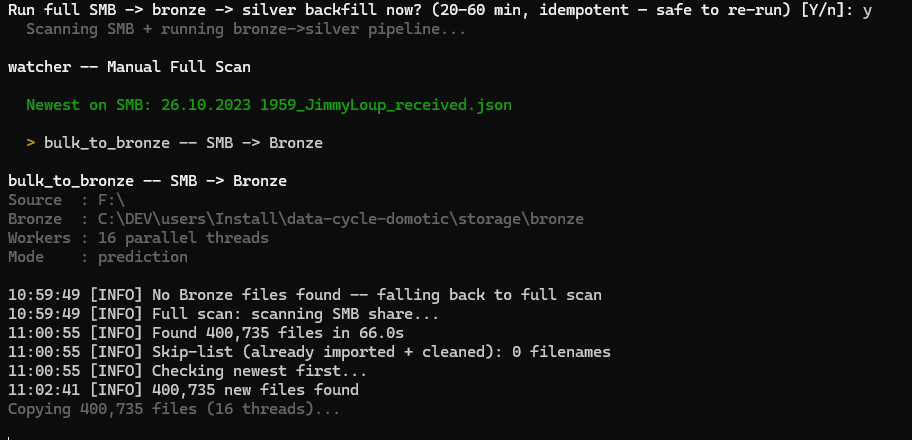
Figure : Phase 7 console output: SMB → bronze → silver backfill prompt.
This is one of the only interactive question during the install. Answer Y on a first install, or N if you want to skip it (e.g. for a quick test on an empty system).

Figure : Phase 7 — confirming the SMB backfill.
The installer first runs bulk_to_bronze (SMB → bronze, file copy) followed by flatten_sensors (bronze → silver, the heavy ETL).
(c) `flatten_sensors` — the long pole:
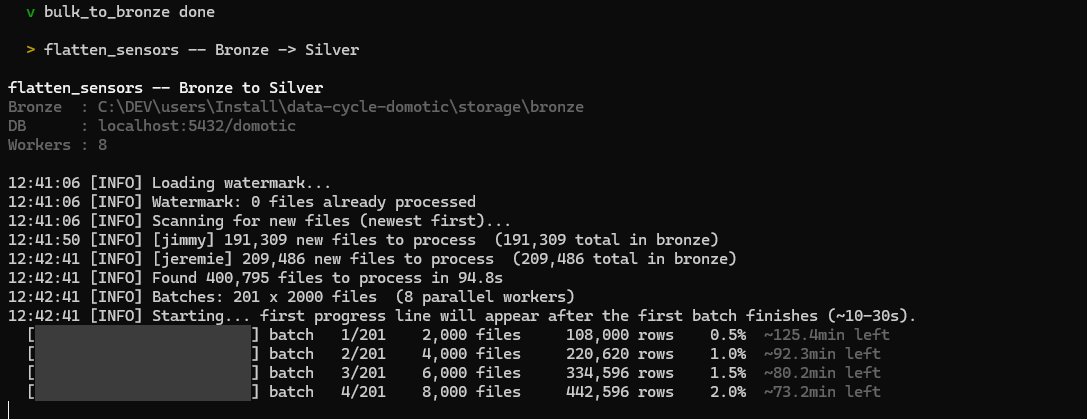
Figure : Phase 7 — flatten_sensors progress bar.
The first ETA is conservative; it tightens as workers warm up and the COPY-into-TEMP-TABLE upsert path gets going. With shared_buffers=4GB tuned (see prerequisites), the full 400k-file backfill finishes in ~6 minutes. Without that tuning, expect ~4 hours.
(d) Weather sFTP download + clean (~30 s): sequential download (sFTP servers dislike parallel sessions) of any new Pred_*.csv files, followed by clean_weather to push them into silver.weather_forecasts.
Phase 8 — Initial gold ETL (~30–60 s)
Once silver is full, the installer runs populate_gold to materialise the star schema:
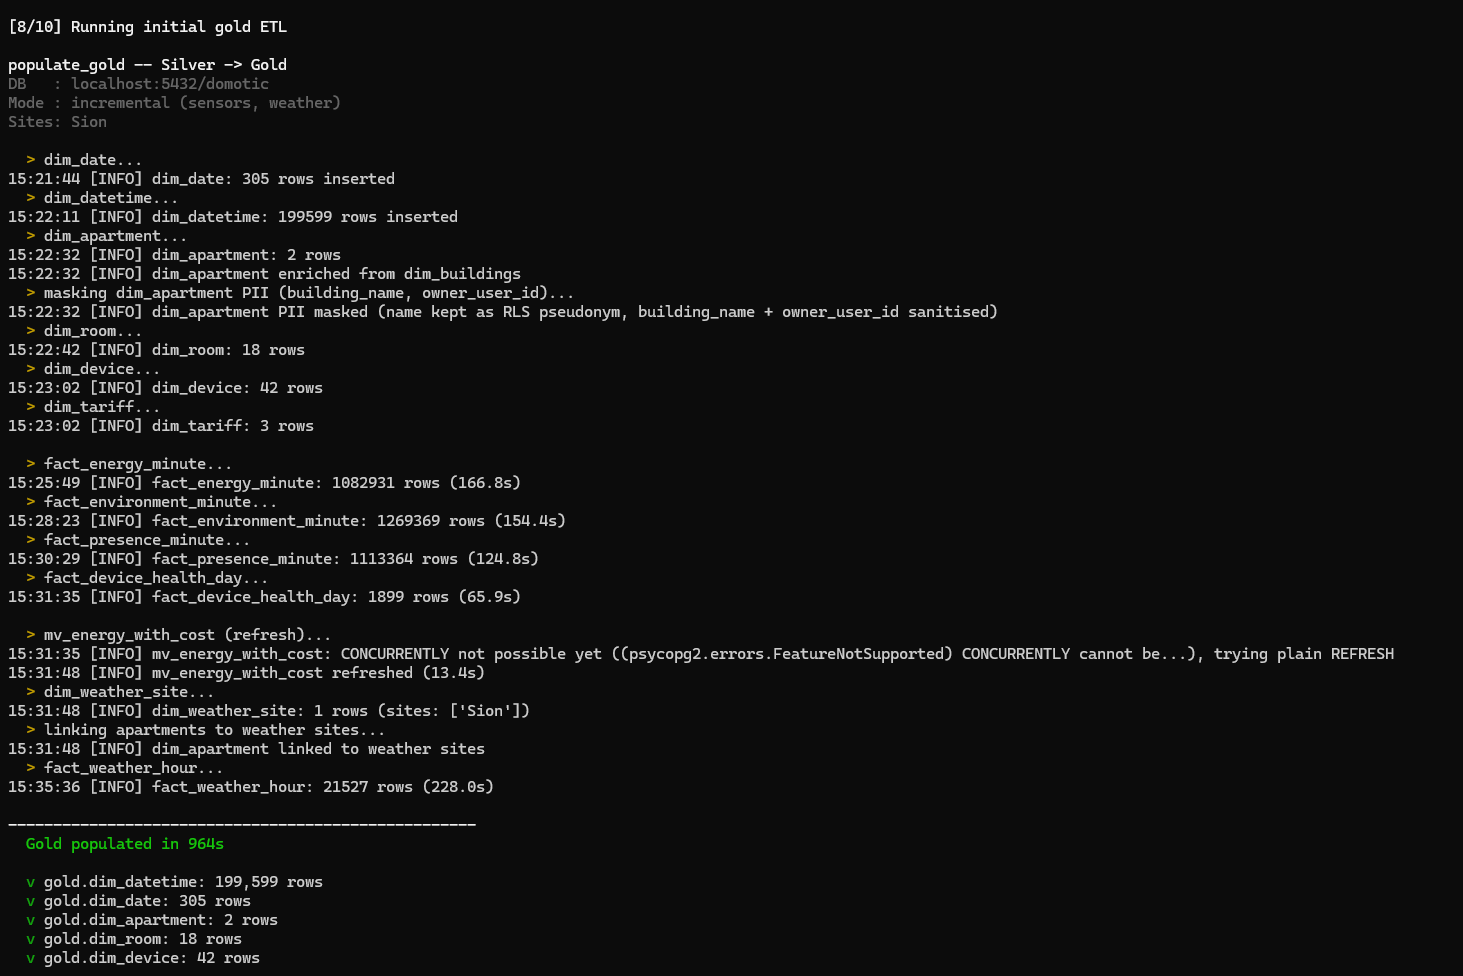
Figure : Phase 8 — populate_gold running.
Note the PII masking line — the installer enforces GDPR Art. 4(1) at the silver → gold boundary (see DECISIONS.md ADR-005). First names are kept as RLS pseudonyms; building names and user IDs are sanitised.
When done you get a summary of every gold table and its row count:
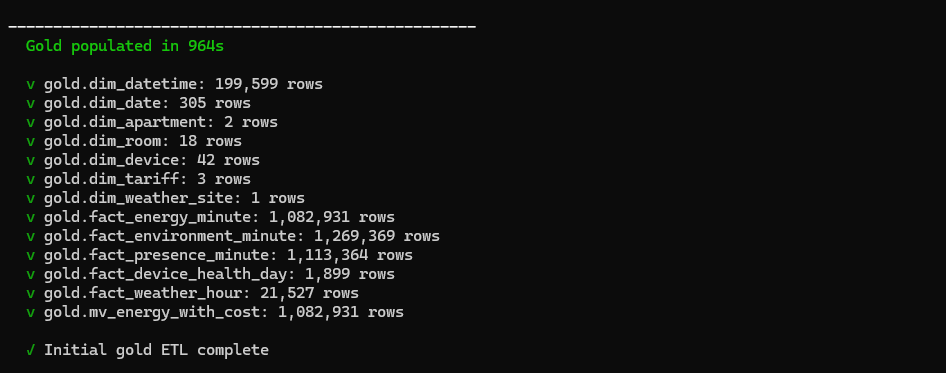
Figure : Phase 8 — gold ETL summary with row counts.
If any of these are 0, check the silver row counts (the watcher / admin pane shows them) and look at logs/populate_gold.log for errors.
Phase 9 — Verify + auto-config BI/KNIME (~30–60 s)

Figure : Phase 9 — BI / KNIME auto-configuration output.
The installer:
point at your local DB (host / port / database_name)
connection in a binary blob the installer can't safely modify. — hence the “.pbix has no Connections file; skipping” warning. You re-point it once after install, guided by the admin pane wizard (see Step 4).
so its Python visuals render correctly.
Phase 10 — Auto-start watcher on login (optional)
Figure : Phase 10 — auto-start watcher registration.
Answering Y drops a shortcut into shell:startup so the watcher launches as a hidden background process every time you sign in.
Final post-install prompts
Two of the six wizard-dropdown actions (SMB backfill, autostart watcher) happen earlier inside Phase 7 and Phase 10. The remaining four are batched here at the end.
After the 10 phases, the installer offers six optional one-shot actions. Any of these you pre-answered in the wizard run silently with that answer — only “Ask during install” choices are surfaced here.
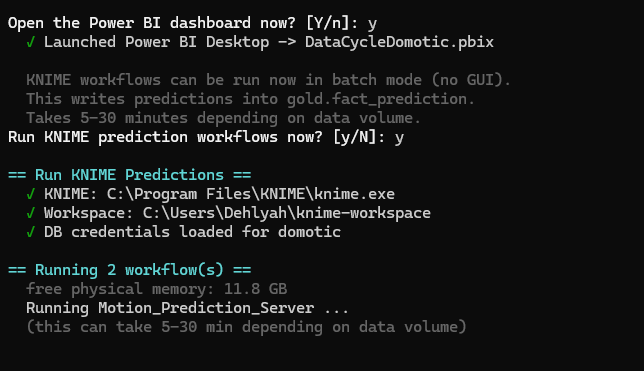
Figure : Final post-install prompt menu.
Step 3 — Verify everything is healthy
The Streamlit admin dashboard at <http://localhost:8501> is the easiest way to verify the install:

Figure : Admin dashboard freshness tiles after a successful install.
What to look for on first launch:
manually)
If any indicator is red or any count is 0, the same dashboard has one-click action buttons (e.g. Run gold ETL (sensors), Run KNIME predictions) to re-trigger that pipeline. The action runs in a subprocess and logs to storage\admin_logs\ for review.
You can also verify from the command line:
Same checks in CLI form — useful for headless automation.
Step 4 — Re-point the Power BI dashboard (one-time)
The first time the dashboard opens, Power BI is still pointing at the developer's database (because of the binary-blob limitation in Phase 9). The admin pane has a guided Power BI First-Time Setup wizard at the top of the page that walks you through the 30-second re-point:
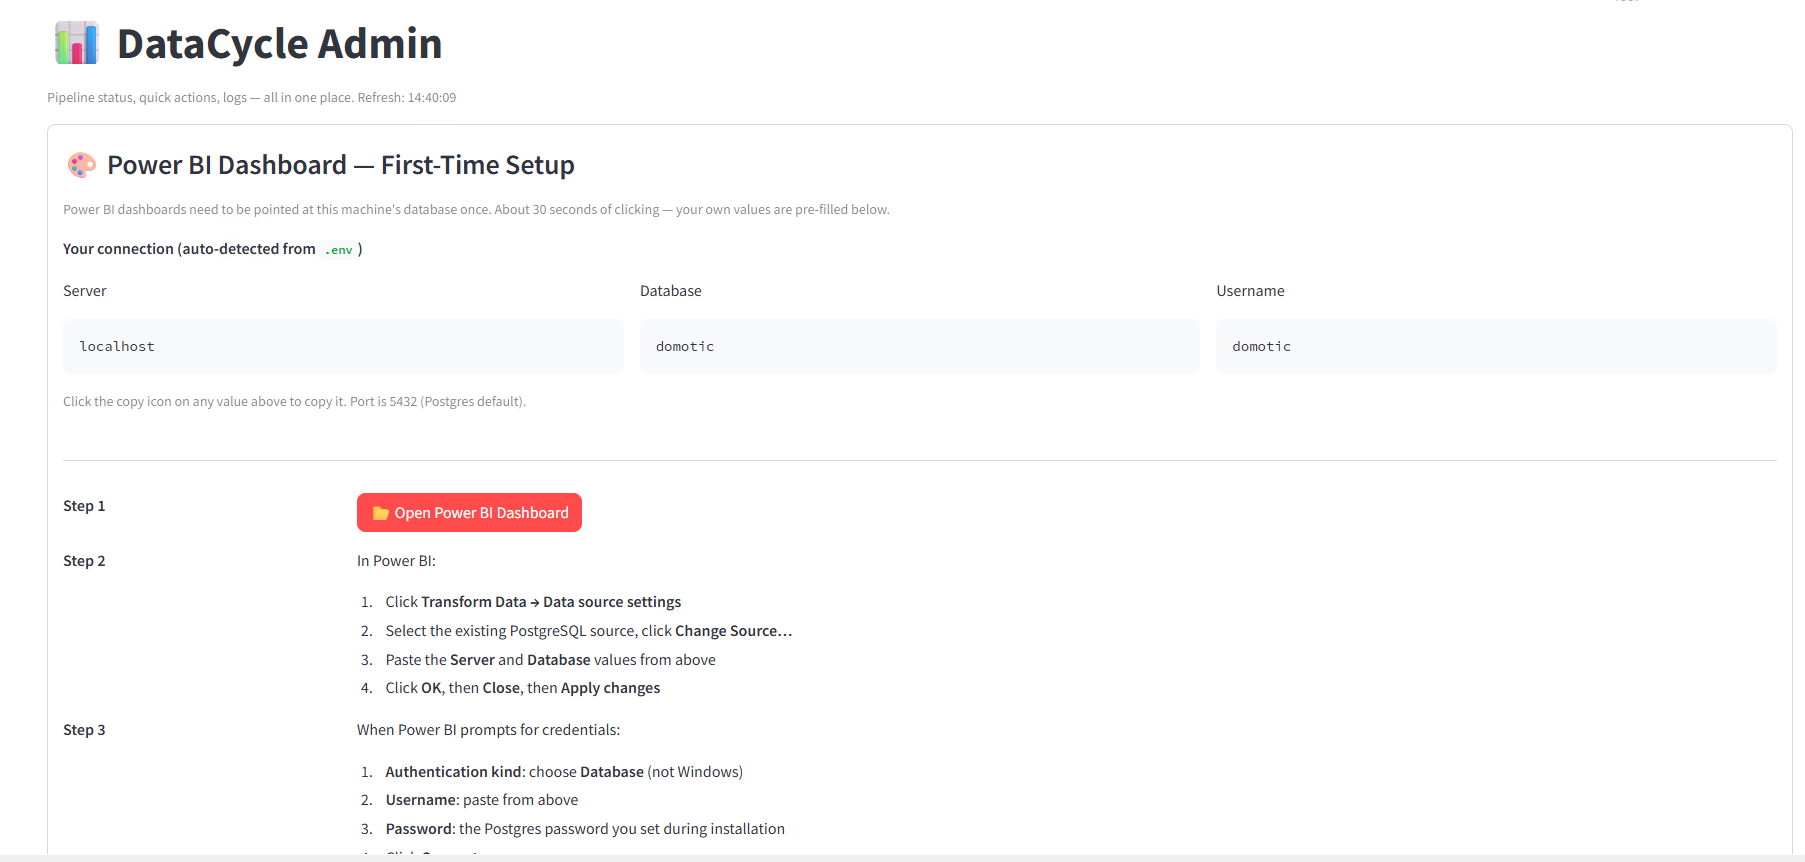
Figure : Power BI re-point wizard in the admin pane.
Your localhost / domotic / domotic values are pre-filled with one-click copy buttons. Click 📂 Open Power BI Dashboard, then in Power BI:
When Power BI prompts for credentials:
Once done, click ✓ I've configured the connection — don't show again in the wizard. The panel collapses to a small green banner; it'll only come back if you switch DBs later.
After re-pointing, the dashboard is live. Useful tricks:
unselect for admin) to preview the row-level security as a tenant
in Power BI to pull the latest
Common install issues
Re-running the installer
The installer is fully idempotent. Re-running it:
So if anything fails partway, just re-run. Total time on a re-run is typically under 15 minutes.
Uninstall / clean reset
That's a full clean slate. The Postgres tuning (shared_buffers) will remain in postgresql.conf — that's fine, it doesn't hurt anything else.
References
Companion documents
the technical doc — Architecture, schema, pipeline internals, ten ADRs. Read this if you need to understand WHY the installer does what it does.
the user guide — How to use the dashboards and admin pane after install.
the report — Final project report (GDPR, scalability, AI usage declaration).
Internal project artefacts
[1] Herbelin, D., Germanier, S., & von Roten, J. (2026). DataCycle Domotic [Source code repository]. GitHub. https://github.com/dehlya/data-cycle-domotic
[2] Herbelin, D., Germanier, S., & von Roten, J. (2026). DataCycle Domotic install wizard [Web application]. https://github.com/dehlya/DCP-Website Locally accessible at http://localhost:3000/install once the site is deployed on the project VM.
Tooling references
[3] PostgreSQL Global Development Group. (2024). PostgreSQL 17 documentation. https://www.postgresql.org/docs/17/
[4] KNIME AG. (2025). KNIME Analytics Platform 5.8 documentation. https://docs.knime.com/
[5] Microsoft Corporation. (2025). Power BI Desktop documentation. https://learn.microsoft.com/power-bi/
[6] Streamlit Inc. (2025). Streamlit documentation. https://docs.streamlit.io/
Course materials
[7] HES-SO Valais. (2026). Module 64-61 Data Cycle Project — Introduction 2026 [Course materials]. Spring semester 2025–2026.